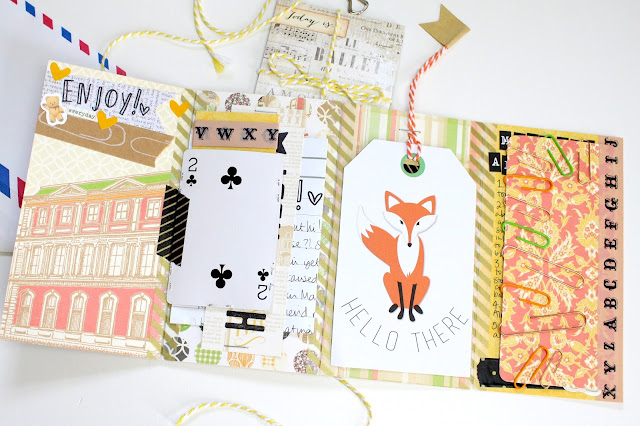
I'm really getting into the swing of things with creating happy mail. I've always loved doing it, but I just haven't always had the time to sit down and do it. I've made it a personal goal to put a lot more effort back into my penpal letters! I have all these things to use, to create something beautiful, but because I'm worried about getting behind with replies I rush through them and forget about the whole reason I started sending snailmail. I haven't been taking on anymore penpals recently, and have also agreed to stop writing to a couple as I don't want to let them down. I feel like I've now got a nice amount of penpals to continue with this little snailmail journey without feeling too much pressure.
You may have already seen the video I did for this happy mail, if you haven't then it will be at the bottom of this blogpost so you can watch it there. But I have added a few things to it after I stopped recording, sometimes that just happens. I will record the process, pack everything away, and then realise that actually I wanted to add something, or something doesn't feel 'complete'. Even though I'm dedicated to creating a good video, I'm not going to set my camera & lighting back up to film me putting down a strip of washi tape and a couple of stickers, so I hope you guys can understand that!
So I did go with a colour scheme for this one as you can tell. I didn't choose the colour scheme straight away, I picked out some card I wanted to use and then chose everything else to go with them.
If you aren't sure about how to choose a colour scheme then doing it this way might help you. The card is the bread of your happy mail sandwich!!
I did debate whether to write straight onto the card when replying to the letter part of the happy mail, but I didn't want it too look too busy. Instead I chose to staple a band one of the middle section, and just tuck the letter behind it. I used my Technique Tuesday Stamps to write 'HEY TABBY' (definitely my new favourite alphabet stamp set hehe). I stamped the date above this as I had kind of slanted the text a bit when stamping, so the date helped to fill this space above and it didn't look as wonky.
If you didn't want any of the written letter showing, you could always pop it in a mini envelope and tuck that behind it instead. It'd look just as cute!
I tend to write the mail tag part on an actual tag in my letters, as long as I have some tags hanging about in my stash. I feel like it's just a little bit more fun and something different to have in the letter. I attached some twine to the top, and stapled it to the card. Instead of cutting off the twine in line with the card I decided to leave it long, trim the end and add a sticky not to the top! I folded it round and cut a triangle out of the end to make it kind of look like a flag. It adds a little extra interest to the happy mail when you have things popping out the sides. Obviously being string it can easily be tucked in, to fit inside the envelope.
Under the mail tag I stuck down a journaling card to help fill in the blank space. I then answered the mail tag questions Tabby sent me, and on the end flap I added lots of paperclips which kind of went with the colour scheme I had going on.
Before starting this happy mail I did rummage through my stash and pull out a few things that I thought might go well with the colour scheme. I scattered bold text throughout the mail, as the colours I went with were all very similar to one another, so contrasting them with the bold make it all pop a lot better! If I'd gone with yellow/orange/red coloured text or a more 'floaty' style font, then it would have all blended into a big happy mail soup. Of course there's nothing wrong with this, but I prefer things to just POP!!
So there you go! That's my most recent piece of happy mail for my penpal Tabby!
I'm really really enjoying creating happy mail again, I can't wait to move so I will have more time to create!
If you want to see the process video, you can do so here:
You will find a full list of supplies used, in the video description, so if you were wondering where things are from take a look there.
Speak to you all soon!!
- Daisy X


I loved watching this video. You're so inspiring with your happy mail!
ReplyDeleteStef
the Noveltea Corner
Aww thank you :3 XX
Delete